Supplies and Materials:
-Blank A2 card (4 1/4"x5 1/2") and envelope (click here for our 60 second envelope lining tutorial!)
-"Birthday" themed printed paper or cardstock measuring 3 3/4"x5
-4"x5 1/4" coordinating solid cardstock
-Balloon diecut, approximately 3" tall
-1/8" wide ribbon, approximately 12" long, in a coordinating color
-Adhesive (2D & 3D)
-Scissors
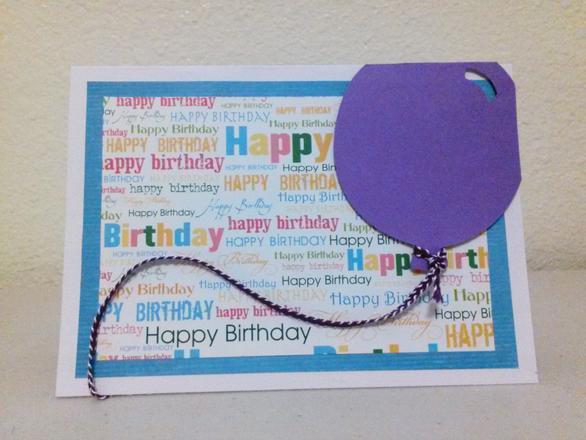
Begin with a blank A2 sized card. Center the piece of solid cardstock on the front of your blank card, then layer the printed paper on top, using a 2D adhesive. Add your balloon with 3D adhesive to the upper right hand corner. Allow it to hang over the edge as much or as little as you want; trim the balloon flush with the edge of the card. Tie the ribbon to the bottom of the balloon with a simple knot, securing it with a liquid adhesive and allowing it to dry completely.
Gluing the ribbon/string takes a little patience. I used Tacky Glue for it's thicker viscosity and strength. Arrange your ribbon on the front of the card how you'd like it to flow. Use a small dot of liquid adhesive in a few spots on the ribbon to anchor it to the page. Allow it to dry completely before adding a few more small dots of adhesive to keep the paper from bubbling. Once the ribbon on the front is dry, open the card and let the ribbon fall along the inside of the card. Glue it down using the same method you used on the front of the card, allowing it to dry completely. Use a sentiment stamp, sticker, rub-on etc on the inside and remember to line your envelope!
You might
also enjoy...
A Birthday Balloon Card
A great card to have on hand for birthdays or congratulatory wishes, this card is easy to put together and can be made in practically any color scheme!
Disclaimer: Please note that some of the links in this post may be affiliate links or ads. There is no additional cost to you, but The Scrap Room will earn a small commission should you choose to purchase through those links. Click here for my full disclaimer. Thank you for your support.
