You might
also enjoy...
Choosing Your Printer Settings
What's the Difference Between Standard and High Quality Print Settings and Which Should I Choose?
Choosing the right printer settings for your craft projects can make a big difference in the final result. Whether you're printing vibrant designs for scrapbooking, intricate patterns for card-making, or simple coloring pages for kids, understanding when to use high-quality settings versus standard options can help you achieve the best balance between quality and cost. In this post, we'll explore how to decide which settings are right for your project and what factors to consider for the perfect print every time.
Disclaimer: Please note that some of the links in this post may be affiliate links or ads. There is no additional cost to you, but The Scrap Room will earn a small commission should you choose to purchase through those links. Click here for my full disclaimer. Thank you for your support.
| ||||||||
| ||||||||
Are you a CRAFT BLOGGER? Join my networking group here!
Choosing the Right Printer Settings for Your Craft Projects
When printing designs for your craft projects, selecting the appropriate print settings can make all the difference in how your final result turns out. It's all about finding the right balance between quality and cost.
High-quality printer settings can bring out the sharpness, vibrant colors, and professional finish you're looking for, making them perfect for detailed projects like cards, scrapbooks, or any design you plan to gift or sell. However, using high-quality settings requires more ink and takes longer to print, which can be a drawback if you're working on multiple designs or projects.
For everyday crafting or simpler designs, standard settings might be just what you need. They still provide good quality, but without the added time and cost of extra ink. The key is to consider the purpose of your project and whether the extra detail is necessary for your desired outcome.
My Personal Experience:
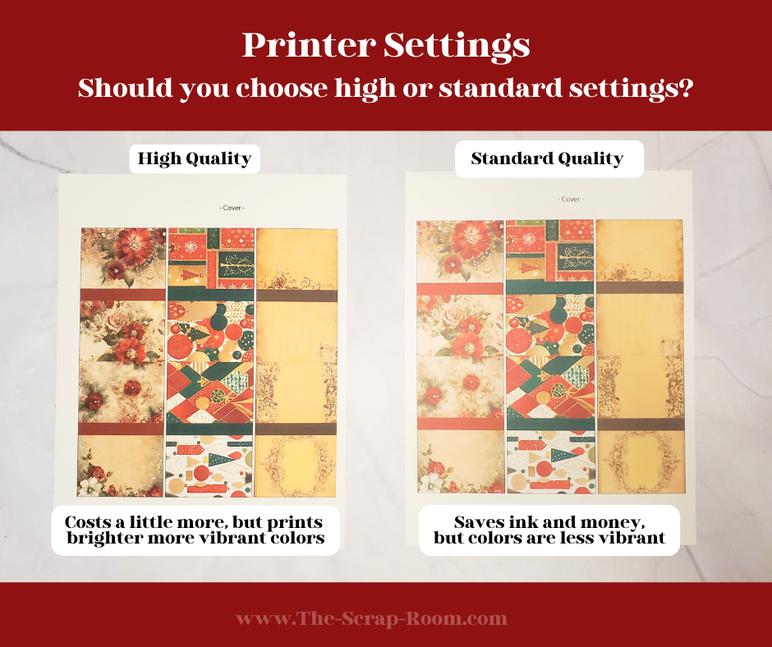
Recently, while working on a new design, I accidentally printed my prototype on standard settings. I decided to reprint it using the high-quality/best printer settings, and the difference was clear. The high-quality print was far more vibrant! Both versions were printed on the same paper and printer, but the results showed how much of an impact the settings can have.
Pros and Cons of High-Quality Printer Settings:
Pros:
Sharper, more detailed prints: Intricate designs really stand out with high-quality settings, making small details clearer and sharper—perfect for cards or scrapbooking.
Better color accuracy: Colors are deeper, more saturated, and more accurate, giving your printed design a true-to-life look.
Smooth gradients and textures: High-quality settings prevent banding, creating smoother color transitions and better texture definition.
Professional finish: Ideal for gifts or saleable projects, high-quality prints give a polished, professional look.
Improved durability: Higher ink saturation can make prints more resistant to fading, helping keepsakes last longer.
Cons:
Increased ink usage: High-quality settings consume more ink, raising your overall printing costs.
Slower printing time: More detail means longer print times, which can slow down production.
Potential paper wear: Thin or lower-quality paper might not handle the extra ink well, leading to warping or bleeding.
Not always necessary: For simple designs, the difference between standard and high-quality may not be noticeable, making the extra ink and time unnecessary.
Cost of materials: High-quality prints may require premium paper to complement the enhanced quality, adding to your project costs.
Finding the Right Balance:
When deciding which settings to use, it's important to weigh these pros and cons based on the type of project you're working on. If you're creating something detailed or high-end, investing the extra time and ink for a high-quality print might be worthwhile. However, for simpler or casual crafting projects, standard settings can provide excellent results without the extra expense.
The type of paper that you choose also plays a big part in your final printed results. Be sure to check out our post about choosing the right paper for your craft projects, which dives into the world of paper types, from cardstock to adhesive paper, and how choosing the right one can make all the difference. Even if you print often, you'll want to stop by—there are some game-changing tips you might
Ultimately, it’s all about balancing quality and cost. By choosing the appropriate print settings for each project, you can make sure you're getting the most out of your materials while still achieving a beautiful result.
