You might
also enjoy...
Disclaimer: Please note that some of the links in this post may be affiliate links or ads. There is no additional cost to you, but The Scrap Room will earn a small commission should you choose to purchase through those links. Click here for my full disclaimer. Thank you for your support.


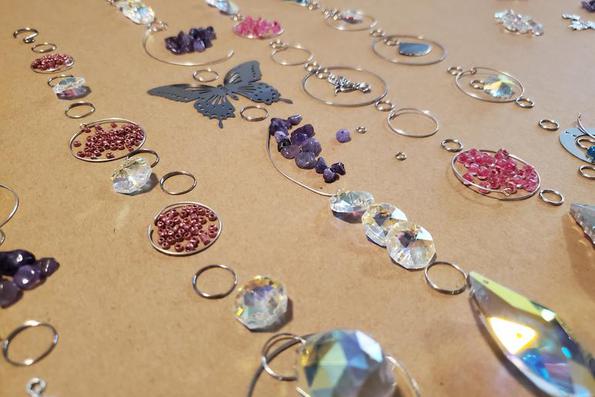
I used a budget-friendly beaded sun catcher making kit that includes enough supplies to make ten complete sun catchers, and it honestly costs less than buying a couple of ready-made ones. I highly recommend starting with a kit because that way you won't have to source everything individually - everything coordinates beautifully and gives you plenty of sparkle to work with. I did add in a few beads and charms from my personal beading stash too to further customize my designs, but this is totally optional - the kit includes plenty to make 10 beautiful designs.
If you’re brand new to beading, you may want to begin with my easier single-strand tutorial first. In that beginner version, I show you how to make a simple beaded sun catcher on one continuous wire. It’s a great foundation before moving into this more customizable, section-by-section method.


If you’re ready to move beyond simple single-strand beading, these customizable beaded sun catchers are the perfect next step. In this intermediate (or ambitious beginner) tutorial, I’ll show you how to build crystal sun catchers piece by piece using jump rings, handmade eyelet loops, gemstone chips, charms, and sparkling prisms. This flexible method allows you to fully customize each design — making them perfect for gifts, craft fairs, home décor, or even selling in your own shop.


Important Techniques to Know
Designing for Balance and Sparkle
When creating intermediate beaded sun catchers like these, think in layers. I like to alternate between metal elements, gemstone chips, and crystal beads to keep the design visually interesting. Hoops create negative space, gemstone chips add texture, and faceted crystals bring in the sparkle.
It’s also helpful to vary the weight slightly from top to bottom so the sun catcher hangs straight. Heavier crystals work best at the bottom, while lighter beads and charms work well in the upper sections.
Because these are built piece by piece, you can easily customize length. If you want a longer sun catcher for a large window, simply add another beaded segment, a hoop, some crystals, a charm - whatever you think looks best. If you prefer a shorter design for smaller windows or car rearview mirrors, reduce the spacing between sections or use less sections.
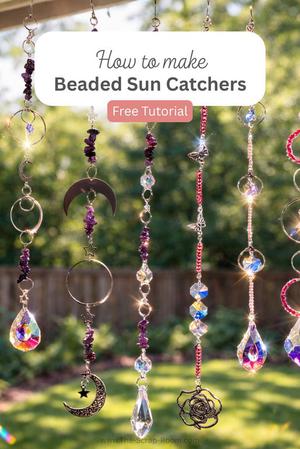
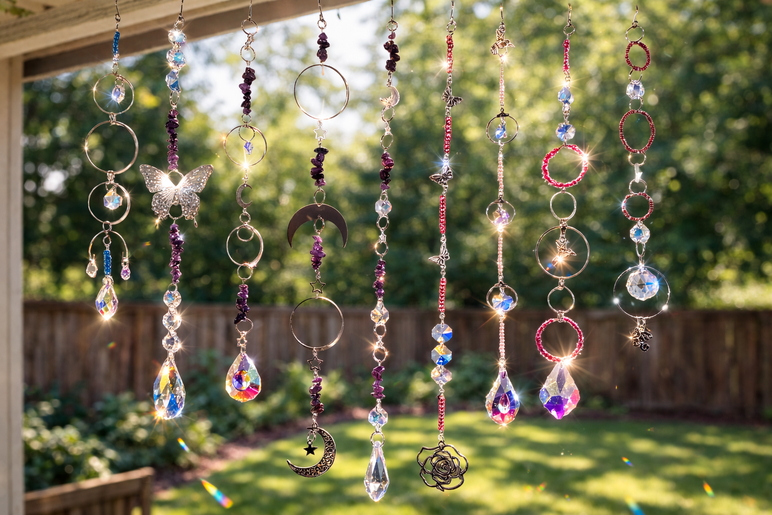
The 9 Sun Catcher Designs
In the full YouTube tutorial above, I walk through all nine of the designs I created using this kit. Each one has a different focal element — including a butterfly charm, crescent moon, rose detail, and modern double-hoop styles — but they all follow the same basic construction method: Piece by piece, and fully customizable.
I've embedded short video clips for each design below so you can get a better look at each one up close.
If you’d like to recreate these exact layouts, grab my printable 9-page template bundle available in my shop, and be sure to snag this kit. Each page shows the bead order and layout for one of the sun catchers, making it easy to follow along or produce consistent designs if you’re making multiples for gifts or craft fairs. You don't need to use the kit to follow along with the patterns - you can use any beads, charms, hoops, pendants and hardware you like, but the printable templates show where to add your hardware and how to piece them together in the same order that I have in my videos, and the kit makes everything super easy with all it's stunning, coordinated elements.
Customizable crystal sun catchers perfect for gifts, home décor, or selling
If you’ve already mastered the beginner single-wire sun catcher, this piece-by-piece method is such a fun way to expand your skills. It gives you more control, more design freedom, and more professional results.
Whether you’re making these for your own windows, creating heartfelt handmade gifts, or exploring a small craft business idea, these customizable beaded sun catchers are beautiful, budget-friendly, and full of sparkle.
Be sure to watch the full video tutorial here, check out the beginner version if you need it, and grab the printable template bundle if you’d like the exact layouts for all nine designs I created in this tutorial.
Happy crafting ✨

For this project you will need:
Optional:
Extra Beads, Charms & Pendants
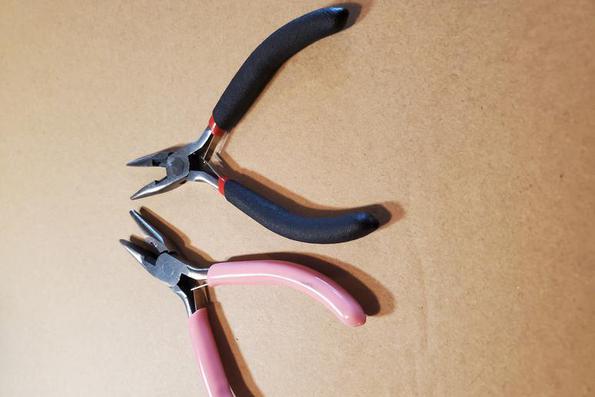
Wire cutters
Extra pliers
How to Make Beaded Sun Catchers (Piece by Piece Method)
Unlike the beginner method where everything is built on one wire, these sun catchers are created in individual components. Each beaded section is made separately, then connected using jump rings. This gives you much more flexibility. You can rearrange sections, swap charms, adjust spacing, or even replace a broken piece later without remaking the entire design.
I like to start by laying out my design on my table before assembling anything. I arrange the hook at the top, then experiment with gemstone chips, spacer beads, charms, and finally the bottom prism or pendant. Seeing everything laid out first helps you balance color, texture, and spacing so the finished sun catcher feels intentional rather than crowded.
If you're a little overwhelmed about how to design your sun catchers and want to feel more confident before you start stringing beads, I created a printable template bundle in my shop that walks you through all 9 of the exact layouts I used in this tutorial. Each page shows the bead order and overall design structure so you can follow along step-by-step without second guessing spacing, balance, or proportions. They’re especially helpful if you’re new to designing your own pieces, want consistent results when making multiples, or plan to sell them and need each one to look polished and intentional. You can use them exactly as written or treat them as a starting point and customize from there — whatever makes the process feel more fun and less overwhelming.
Gift Ideas and Selling Potential
These beaded sun catchers are incredibly giftable. They make thoughtful birthday gifts, housewarming presents, holiday gifts, teacher appreciation gifts, and even wedding décor accents. Because the materials are relatively inexpensive, the perceived value is much higher than the supply cost — especially when the sunlight hits the prisms and creates rainbows.
If you’re thinking about selling them at craft fairs or in your own shop, consider packaging them in a simple organza bag with a small branded tag. Customers love the instant sparkle factor, and these are eye-catching pieces that naturally draw attention at a booth display.
The flexibility of this intermediate method also allows you to customize colors for birth months, special occasions, or customer requests.
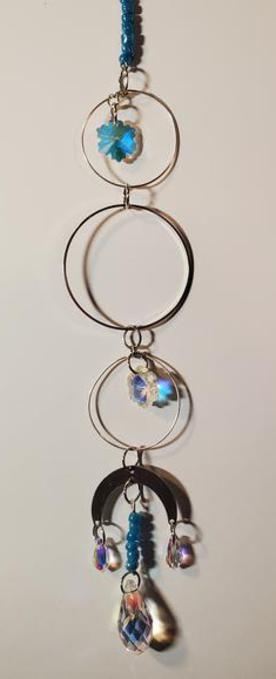
Sun Catcher #1: Snowflake Crystals
This snowflake design was one I created for someone who loves winter and snow. I suspended the 2 snowflake crystals from the sun catcher kit I used in the center of two medium earring hoops. The hoops are open hoops with an eye on one end, so it was easy to add a jump ring to attach the crystal, then I just fed the straight end of the hoop wire through the same eyehole, and looped the end into a circle to secure the hoop closed.
Looping Your Wire
Adding beads to your sun catchers? Instead of the long wire, I've used eye pins and hoops in this project. These are really easy to make as small sections and add to your chain using jump rings.
The kit I used came with some eye pins that are a great length, but I think the hoops were a great addition to the project. They both work similarly as far as adding to your chain.
After adding your beads onto a headpin, straight wire, or hoop, just bend the wire 90 degrees directly above your top bead. This bend helps hold your beads tightly in place and keeps them from shifting while you create the loop. Next, grip the very tip of the wire with your round nose pliers so the pliers are positioned perpendicular to the wire. Then, roll your wrist inward toward the beads, allowing the wire to curl into a loop. Continue rolling until the loop closes back toward the beads, creating a secure eyelet, then pinch closed with your pliers. This eyelet not only locks your beads in place but also gives you a sturdy loop for attaching jump rings.
This technique is one of the most important parts of making professional-looking beaded sun catchers, and does take a little practice. A clean, centered loop makes your design hang straight and ensures it’s strong enough for gifting or selling.
Opening and Closing Jump Rings
You'll be using jump rings a lot in this project. You'll use them to connect all the different elements in your chain, and you can also use them as visual elements, to adjust spacing, to make charms or pendants rotate and hang correctly.
Remember to always open jump rings by twisting them sideways — never pulling them apart. Hold one side of the jump ring with one pair of pliers and the other side with another pair. Gently twist one hand forward and the other backward to open the ring. After attaching your pieces, twist it closed the same way. This keeps the ring round and maintains its strength.
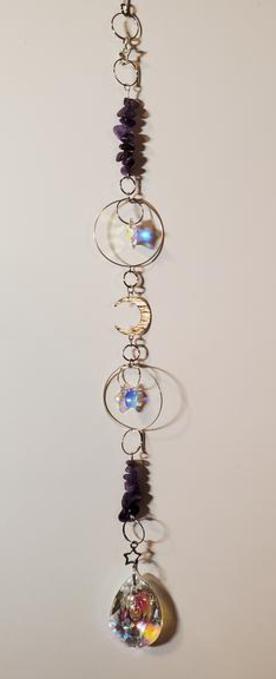
Sun Catcher #2: Moon & Stars 1
This sun catcher features a moon and stars, along with purple beads and crystals. There's a lot going on! But with strategic usage of large jump rings, it breaks everything up and spaces it out nicely, allowing you to see all the lovely charms, but still drawing your eye to the stunning pendant at the bottom. Everything used in this sun catcher was included in the kit, so it's really easy to reproduce this one if you've grabbed one.
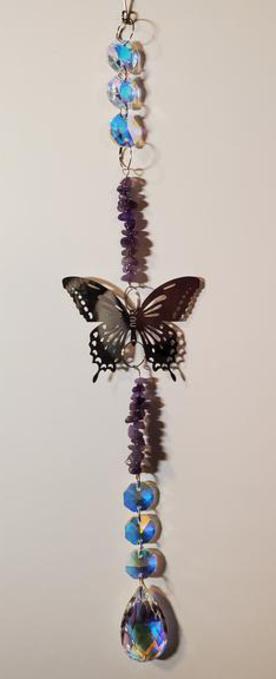
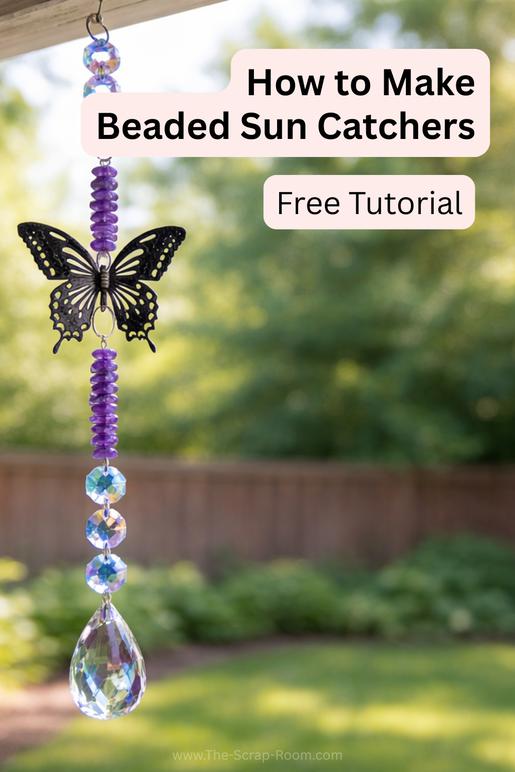
Sun Catcher #3: The Butterfly
This sun catcher was my favorite to make. I have so many nature lovers on my gift giving list, I might have to make some more of these - I just love how this one turned out.
Bold and sparkly this one still manages to draw the eye to one main focal point, and features nice symmetry. This metal butterfly was my deciding factor when I picked out the kit that I used for this project. I'm in LOVE.
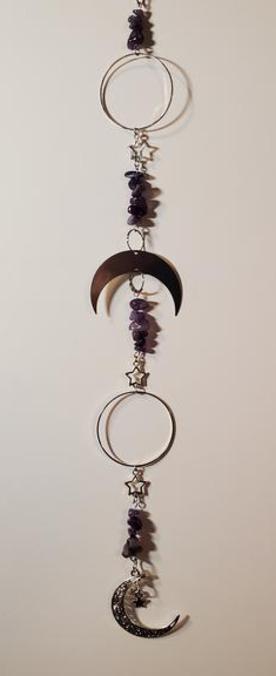
Sun Catcher #4: Moon & Stars 2
Here's another sun catcher with crystals suspended within the hoops. I love this look. Remember, when you want to make something dangle in a hoop, you can adjust the height at which it hangs by changing the jump ring that you attach it with. I used some larger jump rings to add these star crystals, so they'd hang right in the center.
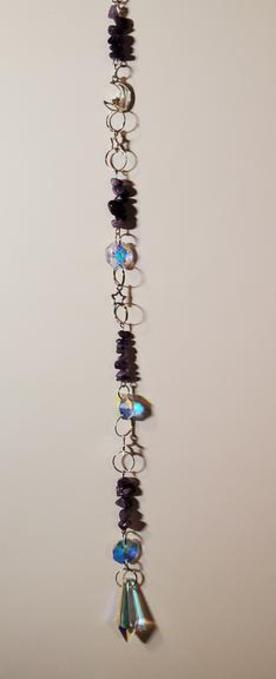
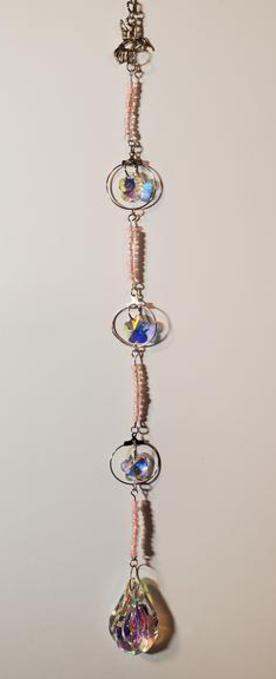
Sun Catcher #5: Moon & Stars 3
This was the third of the three celestial sun catchers I designed, and for this one I chose to use the larger hoops from the kit without dangling anything inside them. I loved the clean negative space it created and felt it beautifully represented the phases of the moon. The kit included so many nature-inspired elements, which made the whole design feel organic and intentional. I especially loved how the hollow star charms added even more openness and lightness, giving the piece a balanced, airy celestial feel.
Sun Catcher #6: Floral 1
This floral sun catcher is one of a set of 3 matching designs I made. I put it together using items from the kit, plus my own stash as well. The hoops in this one are actually earring hoops, and they have a nice built in hole to add a jump ring so you can dangle something in the center - the perfect place to add the floral crystals from the sun catcher kit. I really had fun playing with hoops through out this whole project. If you don't already have a hoop assortment in your beading stash, it's a great addition! I recommend getting an assortment like this bundle here, and these eyepin hoops are really useful to have on hand too.
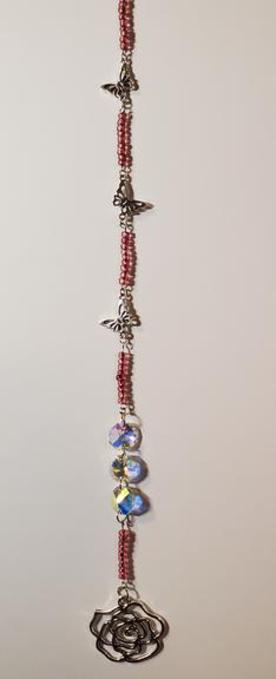
Sun Catcher #7: Rose & Butterflies
I'm obsessed with how these beautiful butterfly charms hang, but the real star of this design is the amazing rose pendant at the bottom - it came with the kit and is one of my favorite elements from the set.
I originally repeated the 3 crystals at the top of this one, but it made it wayyy too long. Since these sun catchers are all made piece by piece though, it was so easy to just remove it and shorten the length. These piece-by-piece sun catchers are so easy to make changes to!
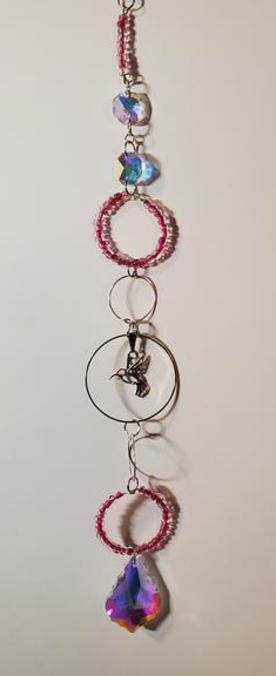
Sun Catcher #8: Hummingbird
Here's another nature inspired one I know you're going to love! I found this precious hummingbird charm over on Amazon, and used it to make this circle inspired design. It's going to go on a memorial tree for a dear friend who lost her battle with breast cancer, so I used some bright pink beads to make it really pop. I used small and medium earring hoops in this design, plus one of the big hoops that was in the beaded sun catcher kit that I used, plus crystals, and a pendant at the bottom.
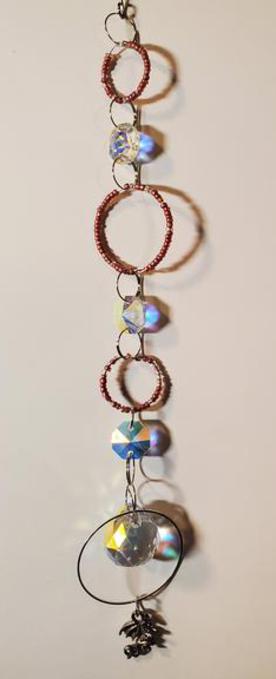
Sun Catcher #9: Pink Dragon
This final design features a decades-old dragon pendant at the bottom, which I really wanted to highlight as the focal point. On its own, though, it didn’t quite have the visual presence I was looking for, so I elevated the design by attaching the dragon to one of the large hoops from the kit using a jump ring. To give it even more impact, I suspended a large round crystal pendant in the center of that hoop. I threaded an oversized jump ring through the large hoop, through the crystal pendant, and through the upper connecting hoop all at once. This clever connection keeps the crystal perfectly centered and suspended inside the hoop instead of slipping downward. The added weight and sparkle of the crystal gives the dragon charm more visual power and makes the entire bottom section feel bold, balanced, and completely intentional.
After creating all nine designs, what I love most is how the same basic technique can produce such completely different results. By simply adjusting the charms, bead combinations, hoop placement, or crystal size, you can shift the entire mood of a piece — from celestial and whimsical to bold and dramatic. That kind of flexibility is what makes this method so powerful. Once you understand how to build each section and connect them securely, you’re not just making one sun catcher… you’re opening the door to endless design possibilities. And that’s exactly why these pieces are not only fun to create, but also incredibly versatile when it comes to gifting or even selling them.
